


一.前言
- 本篇主线包含三点,Hilt的作用、使用(在Mvvm中的使用等)、核心原理(运行时依赖注入实现原理);
- 其中使用包含五个方面,Simple下载地址:
- 通过构造函数注入依赖(Inject注解的使用);
- 提供接口实现注入能力,分别使用Provides和Binds注解实现(Module + Binds注解和Module + Provides注解的使用);
- 同一接口不同实现,使用Qualifier注解进行处理(Module + Provides + Qualifier注解的使用);
- 无法直接通过构造函数注入的依赖(如第三方库实例),通过Module注解来处理(Module + Provides注解的使用);
- Hilt在Mvvm中的使用(Inject + Module + Provides注解的使用);
- Simple效果截图
二.前置知识
2.1.什么是依赖注入(DI)
- 用一句话概括,大体就是:“不要自己内部创建依赖,而是让外部提供的方式来完成”;
2.2.什么是IOC(控制反转)
- 核心思想是将程序的控制权从应用程序代码本身转移给一个外部容器或框架;
2.3.IOC的优缺点
-
优点
- 对象之间的耦合度降低;
- 对象实例的创建变得容易管理;
-
缺点
- 增加了开发和维护成本;
- IOC框架的成熟度本身需要评估;
-
是否使用需要综合评估,小项目不建议使用;
2.4.依赖注入框架的类型
- view注入:Xutils,Android Annotations,ButterKnife
- 参数注入:Arouter
- 对象注入:koin,Dagger2,Hilt
2.5.Hilt的特点
- 相比Dagger2而言,简单 & 提供了Android专属的API,大大降低学习成本和上手复杂度(简化了使用姿势);
- Dagger2是不能帮我们管理对象的使用范围和生命周期,但是在Hilt中不需要考虑这些问题;
2.6.Hilt的作用
- 简化Android应用中的依赖注入管理,减少样板代码,更好的解耦;
三.Hilt的用法
3.1.配置
- 官方文档
- 项目的根级 build.gradle 文件中配置(若是kts中使用,自行更改)
id 'com.google.dagger.hilt.android' version '2.56.2' apply false
- 在模块的build.gradle 文件中添加
plugins {
  id("com.google.devtools.ksp")
  id("com.google.dagger.hilt.android")
}

android {
  ...
}

dependencies {
  implementation("com.google.dagger:hilt-android:2.56.2")
  ksp("com.google.dagger:hilt-android-compiler:2.56.2")
}
- 上方配置是官网提供的,个人创建的是Kotlin和kts类型的项目,依赖时出现了一个报错,错误原因是因为违背了“Hilt 和 KSP 插件必须在同一个层级声明(要么都在根目录,要么都在模块)”;
The KSP plugin was detected to be applied but its task class could not be found.
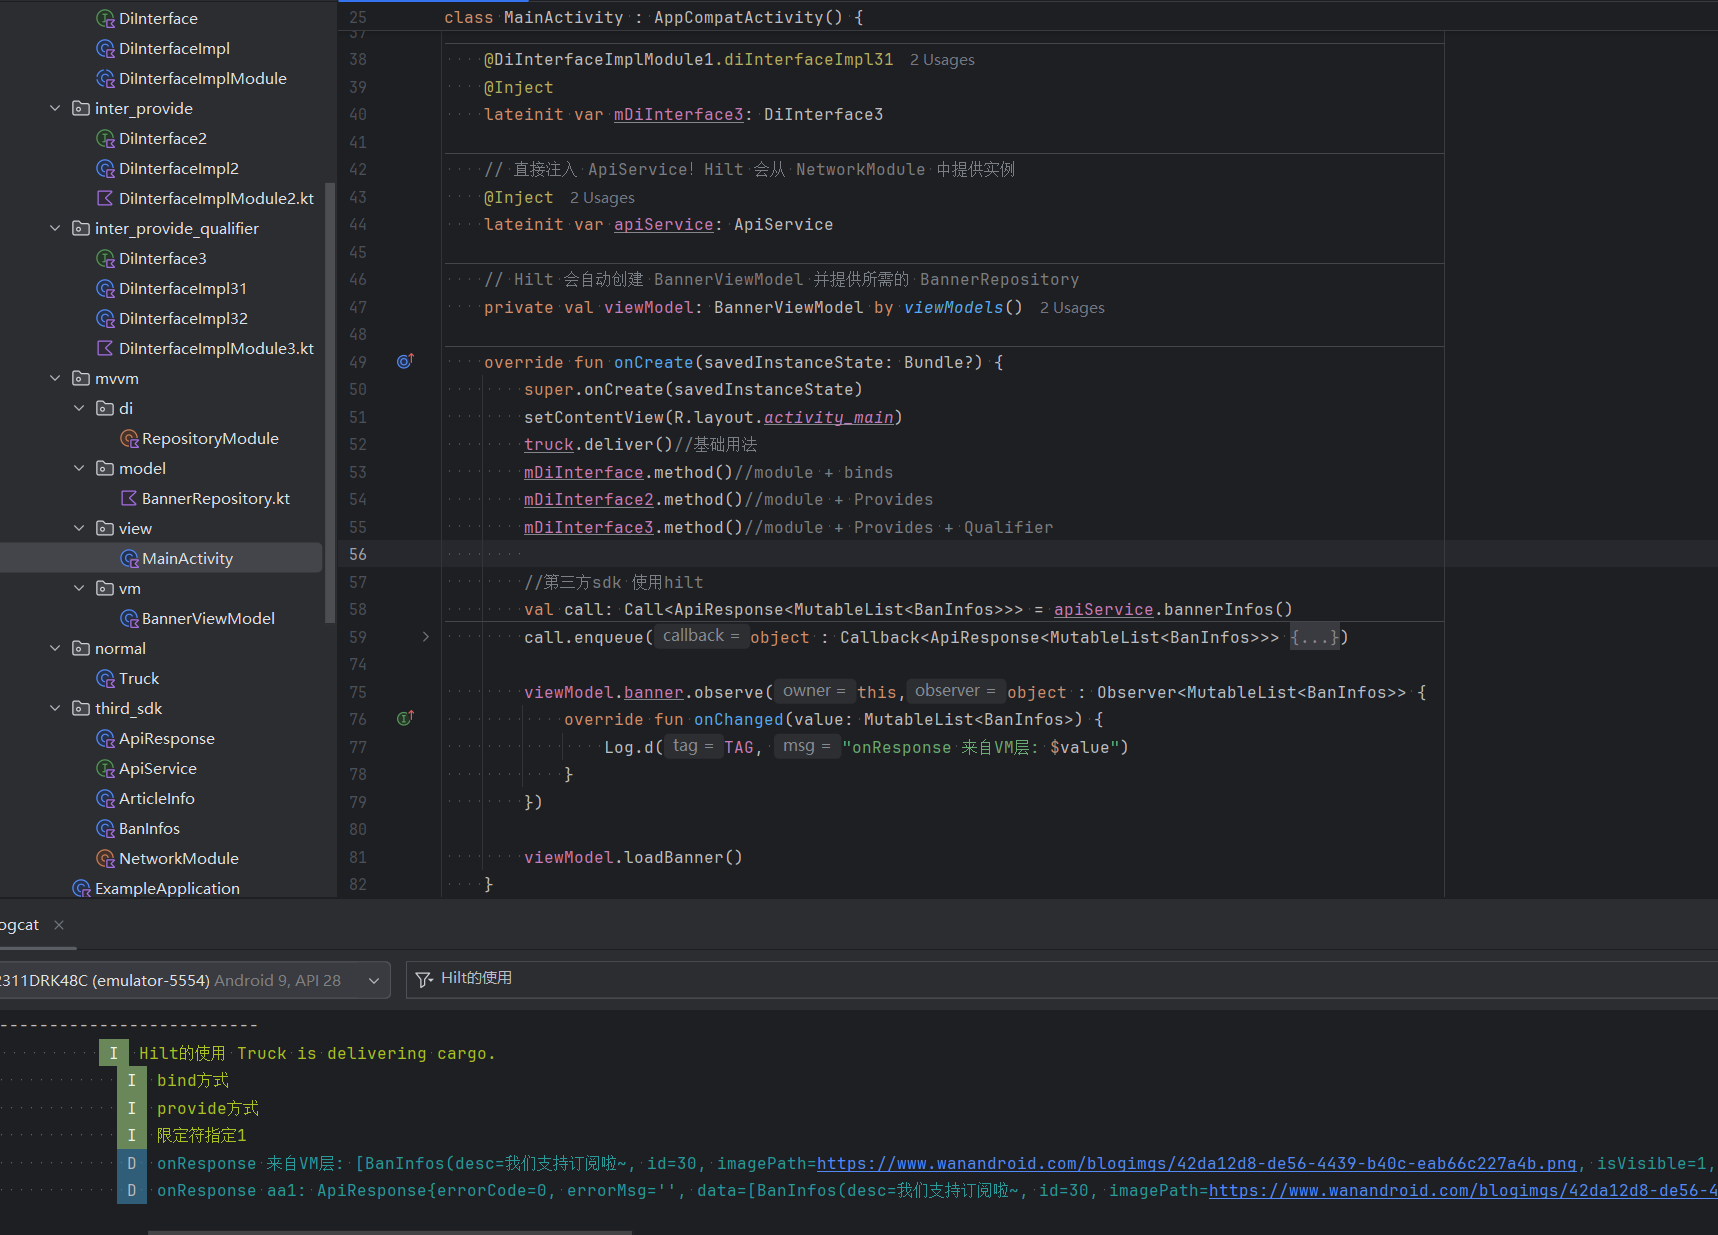
This is an indicator that the Hilt Gradle Plugin is using a different class loader because
it was declared at the root while KSP was declared in a sub-project. To fix this, declare
both plugins in the same scope, i.e. either at the root (without applying them) or at the
sub-projects.
- 贴出完整的配置
//根目录的build.gradle.kts
plugins {
    alias(libs.plugins.android.application) apply false
    alias(libs.plugins.kotlin.android) apply false
    alias(libs.plugins.hilt.android) apply false
    alias(libs.plugins.ksp) apply false
}

//模块级build.gradle.kts
plugins {
    alias(libs.plugins.android.application)
    alias(libs.plugins.kotlin.android)
    alias(libs.plugins.ksp)
    alias(libs.plugins.hilt.android)
}

android {
    namespace = "com.jack.hiltsimple"
    compileSdk = 36

    defaultConfig {
        applicationId = "com.jack.hiltsimple"
        minSdk = 24
        targetSdk = 36
        versionCode = 1
        versionName = "1.0"

        testInstrumentationRunner = "androidx.test.runner.AndroidJUnitRunner"
    }

    buildTypes {
        release {
            isMinifyEnabled = false
            proguardFiles(
                getDefaultProguardFile("proguard-android-optimize.txt"),
                "proguard-rules.pro"
            )
        }
    }
    compileOptions {
        sourceCompatibility = JavaVersion.VERSION_11
        targetCompatibility = JavaVersion.VERSION_11
    }
    kotlinOptions {
        jvmTarget = "11"
    }
}

dependencies {
    implementation(libs.androidx.core.ktx)
    implementation(libs.androidx.appcompat)
    implementation(libs.material)
    implementation(libs.androidx.activity)
    implementation(libs.androidx.constraintlayout)
    testImplementation(libs.junit)
    androidTestImplementation(libs.androidx.junit)
    androidTestImplementation(libs.androidx.espresso.core)

    implementation(libs.hilt.android)
    ksp(libs.hilt.android.compiler)
}

//gradle/libs.versions.toml
[versions]
agp = "8.12.0-alpha07"
kotlin = "2.0.21"
coreKtx = "1.10.1"
junit = "4.13.2"
junitVersion = "1.1.5"
espressoCore = "3.5.1"
appcompat = "1.6.1"
material = "1.10.0"
activity = "1.8.0"
constraintlayout = "2.1.4"
hilt = "2.56.2"

[libraries]
androidx-core-ktx = { group = "androidx.core", name = "core-ktx", version.ref = "coreKtx" }
junit = { group = "junit", name = "junit", version.ref = "junit" }
androidx-junit = { group = "androidx.test.ext", name = "junit", version.ref = "junitVersion" }
androidx-espresso-core = { group = "androidx.test.espresso", name = "espresso-core", version.ref = "espressoCore" }
androidx-appcompat = { group = "androidx.appcompat", name = "appcompat", version.ref = "appcompat" }
material = { group = "com.google.android.material", name = "material", version.ref = "material" }
androidx-activity = { group = "androidx.activity", name = "activity", version.ref = "activity" }
androidx-constraintlayout = { group = "androidx.constraintlayout", name = "constraintlayout", version.ref = "constraintlayout" }
hilt-android = { group = "com.google.dagger", name = "hilt-android", version.ref = "hilt" }
hilt-android-compiler = { group = "com.google.dagger", name = "hilt-android-compiler", version.ref = "hilt" }

[plugins]
android-application = { id = "com.android.application", version.ref = "agp" }
kotlin-android = { id = "org.jetbrains.kotlin.android", version.ref = "kotlin" }
hilt-android = { id = "com.google.dagger.hilt.android", version.ref = "hilt" }
#https://developer.android.google.cn/build/migrate-to-ksp#kts
ksp = { id = "com.google.devtools.ksp", version = "2.0.21-1.0.27" }
3.2.开始使用
- 配置应用程序
- 所有使用 Hilt 的应用都必须包含一个带有 @HiltAndroidApp 注解的 Application 类
@HiltAndroidApp
class ExampleApplication : Application(){
}
3.2.1.Hilt的最小化使用
- 通过构造函数注入其依赖
class Truck @Inject constructor() {
    fun deliver() {
        println("Hilt的使用 Truck is delivering cargo.")
    }
}
- 通过在constructor()中使用@Inject(声明该对象需要被动态注入),告知Hilt这个Truck类可以被Hilt管理,Hilt就知道了如何从相应组件提供必要依赖项的实例;
- 在MainActivity中使用
@AndroidEntryPoint
class MainActivity : AppCompatActivity() {
    @Inject
    lateinit var truck: Truck

    override fun onCreate(savedInstanceState: Bundle?) {
        super.onCreate(savedInstanceState)
        setContentView(R.layout.activity_main)
        truck.deliver()//基础用法
    }
}
- 在需要创建Truck类的时候,定义Truck的变量,然后在其上方定义@Inject注解,就相当于传统方式的类的创建;
- @AndroidEntryPoint:声明该类是一个可以注入的入口类;但仅支持以下类型中进行依赖注入:
- AppCompatActivity的子类
- androidx下的Fragment子类
- View
- Service
- BroadcastReceiver
- Application(通过使用 @HiltAndroidApp)
- ViewModel(通过使用 @HiltViewModel)
3.2.2.接口类型的注入
- 定义接口和接口的实现类 & 定义抽象类DiInterfaceImplModule并使用 Module + Binds注解
interface DiInterface {
    fun method()
}

class DiInterfaceImpl @Inject constructor() : DiInterface {
    override fun method() {
        Log.i("Hilt的使用 ", "bind方式")
    }
}
- 带有 @Module 注解的类,会告知 Hilt 如何提供某些类型的实例。DiInterfaceImplModule 必须使用 @InstallIn 为 Hilt 模块添加注解,以告知 Hilt 每个模块将用在或安装在哪个 Android 类中;
@Module
@InstallIn(ActivityComponent::class)
abstract class DiInterfaceImplModule {
    @Binds
    abstract fun bindInterImpl(diInterface: DiInterfaceImpl): DiInterface
}
- Module:提供无法直接通过构造函数注入的依赖(如接口、第三方库实例),通过灵活使用 @Module,可以清晰地组织所有依赖项的创建逻辑;
- 上方DiInterfaceImpl实现类是可以依赖注入的,其有构造函数,需要在构造函数位置添加@Inject注解;
- 使用Module + Binds注解,DiInterfaceImplModule需要定义为抽象类,Binds修饰的方法需要定义为抽象方法,返回值为定义的接口类型;
- InstallIn注解:用来告诉Hilt这个模块可以被哪些组件应用 & 同时声明该模块中对象的声明周期;
- ActivityComponent:表示注入器对象为Activity;
- 其它类型的Component组件如下(from官网):
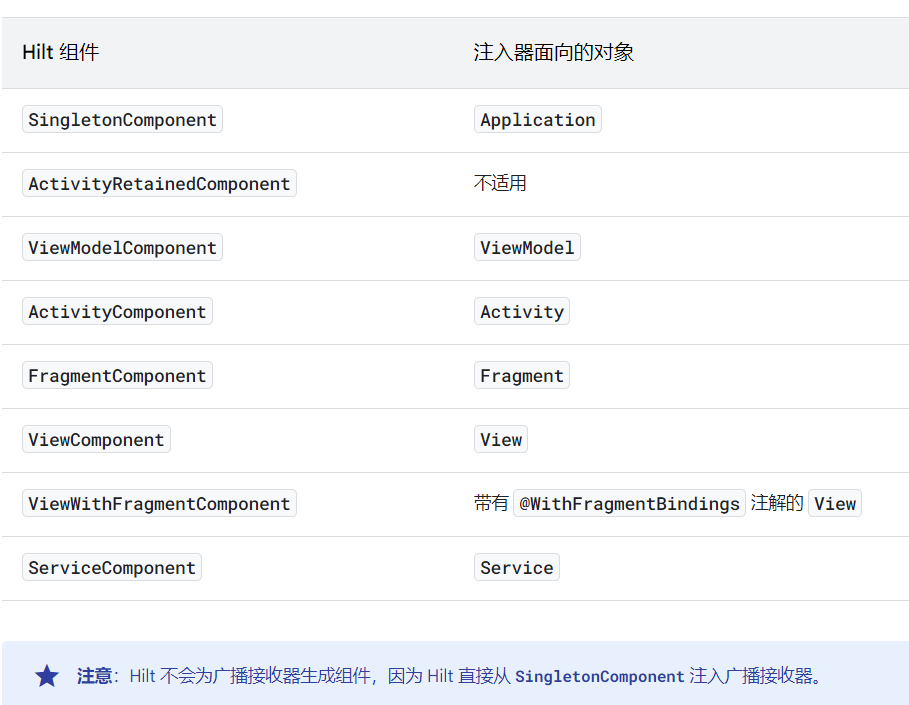
- 其它类型的Component组件如下(from官网):
- 在MainActivity中使用DiInterface
@AndroidEntryPoint
class MainActivity : AppCompatActivity() {
    @Inject
    lateinit var mDiInterface: DiInterface

    override fun onCreate(savedInstanceState: Bundle?) {
        super.onCreate(savedInstanceState)
        setContentView(R.layout.activity_main)
        mDiInterface.method()
    }
}
- 接口类型的注入除了使用Module + Binds注解,还可以使用Module + Provides注解,下方将全部相关源码贴出:
//DiInterface2接口
interface DiInterface2 {
    fun method()
}

//DiInterfaceImpl2实现类
class DiInterfaceImpl2 @Inject constructor() : DiInterface2 {
    override fun method() {
        Log.i("Hilt的使用 ", "provide方式")
    }
}

//带有 @Module 注解的类
@Module
@InstallIn(ActivityComponent::class)
object DiInterfaceImplModule1 {
    @Provides
    fun provideDiImpl(diInterface: DiInterfaceImpl2): DiInterface2 {
        return diInterface
    }
}

//MainActivity中使用
@AndroidEntryPoint
class MainActivity : AppCompatActivity() {
    @Inject
    lateinit var mDiInterface2: DiInterface2

    override fun onCreate(savedInstanceState: Bundle?) {
        super.onCreate(savedInstanceState)
        setContentView(R.layout.activity_main)
        mDiInterface2.method()//module + Provides
    }
}
- @Binds 同 @Provides 对比:
- @Binds:需要在方法参数里面明确写明接口的实现类;
- @Provides:不需要在方法参数里面明确指明接口的实现类,但需要给出具体的实现标记模块中的一个方法,该方法负责创建和提供一个类型的实例;
- 两者不能同时出现在一个module中;
- 选择原则:简单绑定 → 用 @Binds(更简洁,性能稍好),复杂创建 → 用 @Provides(更灵活,功能更强);
3.2.3.Qualifier注解的使用
- 场景举例:同一接口有多个不同实现,使用Qualifier注解进行处理;
- Qualifier核心作用:解决依赖冲突;消除歧义,让 Hilt 的依赖注入更加精确和可控;
//定义接口DiInterface3
interface DiInterface3 {
    fun method()
}
//实现类1
class DiInterfaceImpl31 @Inject constructor() : DiInterface3 {
    override fun method() {
        Log.i("Hilt的使用 ", "限定符指定1")
    }
}
//实现类2
class DiInterfaceImpl32 @Inject constructor() : DiInterface3 {
    override fun method() {
        Log.i("Hilt的使用 ", "限定符指定2")
    }
}
//使用Module修饰的类
@Module
@InstallIn(ActivityComponent::class)
object DiInterfaceImplModule1 {
    @Qualifier
    @Retention(AnnotationRetention.RUNTIME)
    annotation class diInterfaceImpl31

    @Qualifier
    @Retention(AnnotationRetention.RUNTIME)
    annotation class diInterfaceImpl32

    @diInterfaceImpl31
    @Provides
    fun provideDiImpl1(): DiInterface3 {
        return DiInterfaceImpl31()
    }

    @diInterfaceImpl32
    @Provides
    fun provideDiImpl2(): DiInterface3 {
        return DiInterfaceImpl32()
    }
}
- 在DiInterfaceImplModule1类中定义了两个注解 & 使用了Qualifier,然后分别在provideDiImpl1和provideDiImpl2函数上面使用;
- 在MainActivity中的使用,DiInterface3类型的变量上方多使用了一个注解;
@AndroidEntryPoint
class MainActivity : AppCompatActivity() {
    @diInterfaceImpl31
    @Inject
    lateinit var mDiInterface3: DiInterface3

    override fun onCreate(savedInstanceState: Bundle?) {
        super.onCreate(savedInstanceState)
        setContentView(R.layout.activity_main)

        mDiInterface3.method()//module + Provides + Qualifier
    }
}
3.2.4.外部库的注入
- 通过定义Module注解的类的方式来实现
//ApiResponse类
class ApiResponse<T> {
    var errorCode = 0
    var errorMsg: String? = null
    var data: T? = null
        private set

    override fun toString(): String {
        return "ApiResponse{" +
                "errorCode=" + errorCode +
                ", errorMsg='" + errorMsg + '\'' +
                ", data=" + data +
                '}'
    }
}
//ApiService类
interface ApiService {
    @GET("banner/json")
    fun bannerInfos(): Call<ApiResponse<MutableList<BanInfos>>>
}
//BanInfos数据类
data class BanInfos(
    var desc: String,
    var id: Int,
    var imagePath: String,
    var isVisible: Int,
    var order: Int,
    var title: String,
    var type: Int,
    var url: String
)
//Module注解修饰的类
@Module // 1. 声明这是一个模块
@InstallIn(SingletonComponent::class) // 2. 安装在应用级组件中,全局单例
object NetworkModule { // 通常声明为 object(单例),因为不需要状态

    @Provides // 3. 标记这是一个提供依赖的方法
    @Singleton // 4. 声明提供的实例是单例的
    fun provideOkHttpClient(): OkHttpClient {
        return OkHttpClient.Builder()
            .connectTimeout(20, TimeUnit.SECONDS)
            .readTimeout(20, TimeUnit.SECONDS)
            .build()
    }

    @Provides
    @Singleton
    fun provideRetrofit(okHttpClient: OkHttpClient): Retrofit {
        // 注意:参数 okHttpClient 由 Hilt 调用上面的 provideOkHttpClient 方法自动提供
        return Retrofit.Builder()
            .baseUrl("https://www.wanandroid.com/")
            .client(okHttpClient)
            .addConverterFactory(GsonConverterFactory.create())
            .build()
    }

    @Provides
    @Singleton
    fun provideApiService(retrofit: Retrofit): ApiService {
        // 参数 retrofit 由上面的 provideRetrofit 方法提供
        return retrofit.create(ApiService::class.java)
    }
}
//在MainActivity中的使用
@AndroidEntryPoint
class MainActivity : AppCompatActivity() {
    // 直接注入 ApiService!Hilt 会从 NetworkModule 中提供实例
    @Inject
    lateinit var apiService: ApiService

    override fun onCreate(savedInstanceState: Bundle?) {
        super.onCreate(savedInstanceState)
        setContentView(R.layout.activity_main)

        //不使用hilt
//        val retrofit = Retrofit.Builder().baseUrl("https://www.wanandroid.com/")
//            .addConverterFactory(GsonConverterFactory.create())
//            .build()
//        val request = retrofit.create<ApiService>(ApiService::class.java)
//        val call: Call<ApiResponse<MutableList<BanInfos>>> = request.bannerInfos()

        //第三方sdk 使用hilt
        val call: Call<ApiResponse<MutableList<BanInfos>>> = apiService.bannerInfos()
        call.enqueue(object : Callback<ApiResponse<MutableList<BanInfos>>> {
            override fun onResponse(
                call: Call<ApiResponse<MutableList<BanInfos>>>,
                response: Response<ApiResponse<MutableList<BanInfos>>>
            ) {
                Log.d(TAG, "onResponse aa1: " + response.body())
            }

            override fun onFailure(
                call: Call<ApiResponse<MutableList<BanInfos>>>,
                t: Throwable
            ) {
                Log.d(TAG, "onResponse aa2: " + t.message)
            }
        })
    }
}
3.2.5.在Mvvm中的使用
- ApiService类和NetworkModule类用3.2.4中的,其余代码如下所示:
//DI
@Module
@InstallIn(SingletonComponent::class)
object RepositoryModule {
    @Provides
    @Singleton
    fun provideBannerRepository(
        apiService: ApiService, // Hilt 会根据third_sdk中的 NetworkModule 自动提供
    ): BannerRepository {
        return BannerRepositoryImpl(apiService)
    }
}

//M层
// BannerRepository.kt
interface BannerRepository {
    fun getBanner(): Call<ApiResponse<MutableList<BanInfos>>>
}

// BannerRepositoryImpl.kt
class BannerRepositoryImpl @Inject constructor(
    private val apiService: ApiService,
//    private val localDataSource: UserLocalDataSource
) : BannerRepository {
    override fun getBanner(): Call<ApiResponse<MutableList<BanInfos>>> {
        // ... 业务逻辑,比如先查本地,再请求网络
        return apiService.bannerInfos()
    }
}

//VM层
@HiltViewModel // 关键注解
class BannerViewModel @Inject constructor(
    private val bannerRepository: BannerRepository // 通过构造函数注入 Repository
) : ViewModel() {

    var banner = MutableLiveData<MutableList<BanInfos>>()

    fun loadBanner() {
        val fetchedBanner = bannerRepository.getBanner()
        fetchedBanner.enqueue(object : Callback<ApiResponse<MutableList<BanInfos>>> {
            override fun onResponse(
                call: Call<ApiResponse<MutableList<BanInfos>>>,
                response: Response<ApiResponse<MutableList<BanInfos>>>
            ) {
                val result: MutableList<BanInfos>? = response.body()?.data
                banner.value = result!!
            }

            override fun onFailure(
                call: Call<ApiResponse<MutableList<BanInfos>>>,
                t: Throwable
            ) {
            }
        })
    }
}

//V层
@AndroidEntryPoint
class MainActivity : AppCompatActivity() {
    // Hilt 会自动创建 BannerViewModel 并提供所需的 BannerRepository
    private val viewModel: BannerViewModel by viewModels()

    override fun onCreate(savedInstanceState: Bundle?) {
        super.onCreate(savedInstanceState)
        setContentView(R.layout.activity_main)


        viewModel.banner.observe(this,object : Observer<MutableList<BanInfos>> {
            override fun onChanged(value: MutableList<BanInfos>) {
                Log.d(TAG, "onResponse 来自VM层: $value")
            }
        })

        viewModel.loadBanner()
    }
}
- 上方代码的好处:Repository依赖注入到VM层中,ViewModel注入Repository等依赖,并省去 ViewModelProvider.Factory 的样板代码
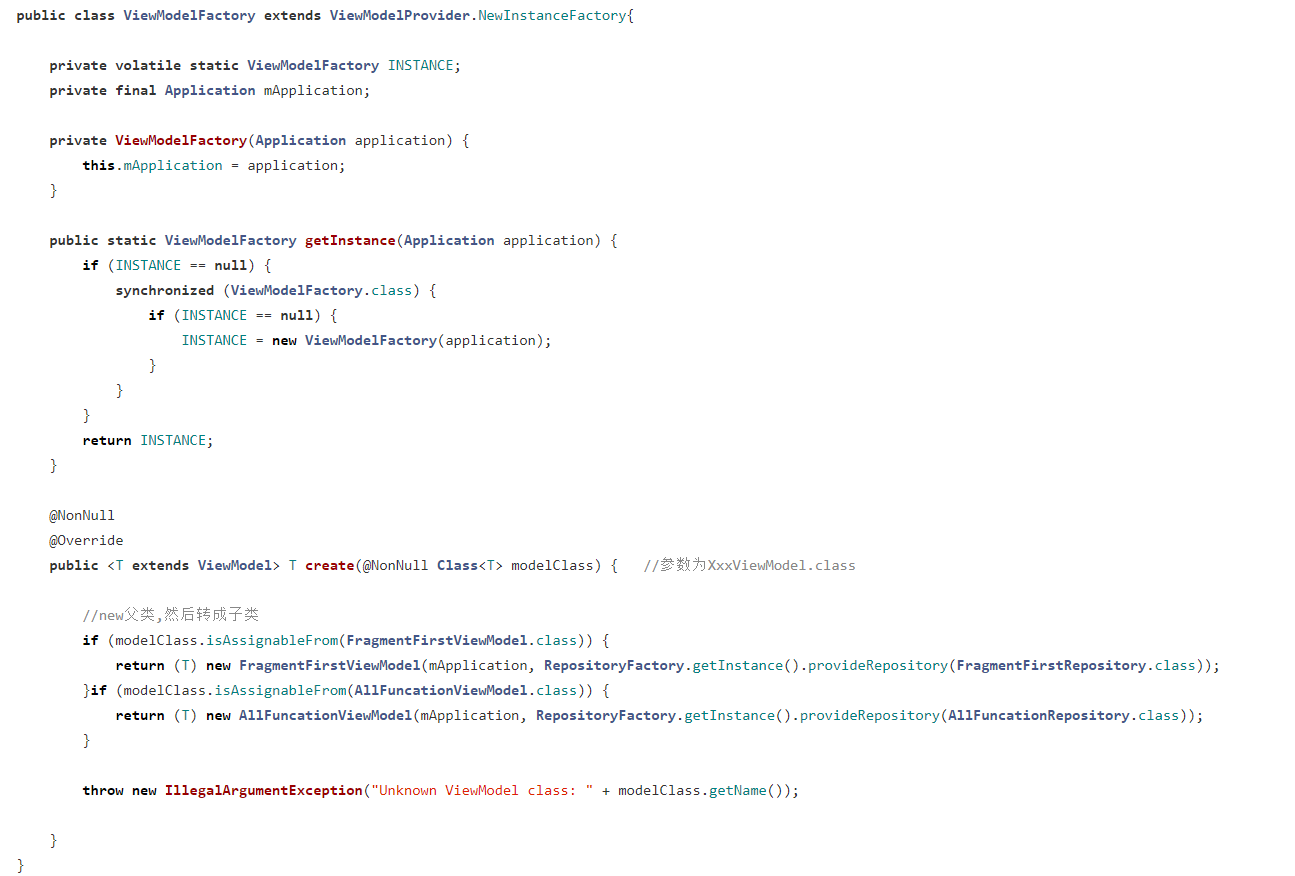
- 不使用Hilt之前,项目中使用了是下方的结构化代码,RepositoryFactory.java和ViewModelFactory.java都需要写,下方仅列出一个文件的
3.3.总结
- 3.2.5中使用到了Singleton注解,这个是作用域注解,作用是为依赖项提供生命周期管理;作用域必须与Component的作用域匹配,组件跟作用域关系如下:
| 作用域注解 | 绑定到的组件 | 生命周期 |
|---|---|---|
| @Singleton | SingletonComponent | 应用级别(整个应用生命周期) |
| @ActivityScoped | ActivityComponent | Activity 生命周期 |
| @FragmentScoped | FragmentComponent | Fragment 生命周期 |
| @ViewScoped | ViewComponent | View 生命周期 |
| @ViewModelScoped | ViewModelComponent | ViewModel 生命周期(跨配置变更) |
- Hilt 注入的字段不能为私有字段。尝试使用 Hilt 注入私有字段会导致编译错误;
- Hilt支持的入口点中不包括ContentProvider;
- 相比Dagger2,使用过程中不需要 创建注解器 & 手动注入;
四.Hilt运行时依赖注入实现原理
- Hilt的原理包含了Gradle插件做字节码插桩(未开源)和运行时代码生成方面;我们以一个接口注入的案例来分析:
@Module
@InstallIn(SingletonComponent::class)
abstract class MainModule {
    @Binds
    abstract fun bindService(impl:LoginServiceImpl):ILoginService

}

interface ILoginService{
    fun login()
}

class LoginServiceImpl @Inject constructor(@ApplicationContext val context: Context):ILoginService{
    override fun login() {
        Toast.makeText(context,"LoginServiceImpl login", Toast.LENGTH_SHORT).show()
    }
}
- 在MainActivity中的使用
@AndroidEntryPoint
class MainActivity : AppCompatActivity() {
    @Inject
    lateinit var iLoginService: ILoginService

    override fun onCreate(savedInstanceState: Bundle?) {
        super.onCreate(savedInstanceState)
        setContentView(R.layout.activity_main)

        iLoginService.login()
    }
}
- 源码分析目标,三个:
- 分析ILoginService实现类LoginServiceImpl的创建时机;
- 分析MainActivity中成员变量iLoginService的赋值时机;
- 因为InstallIn为主使用了SingletonComponent,所以要分析iLoginService的生命周期为什么与应用进程相同(从 Application#onCreate 到进程终止);
4.1.源码分析入口
- 我们先查看我们项目中所写的两个文件(ExampleApplication和MainActivity)的字节码文件,先看ExampleApplication的字节码信息

- 同理MainActivity的字节码信息如下
.class public final Lcom/jack/hiltsimple/mvvm/view/MainActivity;
.super Lcom/jack/hiltsimple/mvvm/view/Hilt_MainActivity;
//...
.method protected onCreate(Landroid/os/Bundle;)V
	//...
    .line 54
    invoke-super {p0, p1}, Lcom/jack/hiltsimple/mvvm/view/Hilt_MainActivity;->onCreate(Landroid/os/Bundle;)V
//...
- 不论是ExampleApplication还是MainActivity,其父类会被替换成Hilt_开头的文件,该文件就是Hilt生成的(在编译阶段都会创建以 Hilt_ 为前缀+类名为后缀的对象实现注入管理类)。通过字节码可以看到,MainActivity用super.onCreate自动调用父类的onCreate(自动inject注入操作 实现无缝注入);
- Hilt_ExampleApplication的能力是创建ApplicationComponent组件对象。ApplicationComponent组件对象非常重要,用来管理对应Module中所定义的方法和对象生命周期作用域的,是核心。另外,还会在onCreate中调用inject(injectExampleApplication)工作,即:Application的注入工作;
- Component是Dagger2中的概念,只不过在Hilt中被屏蔽掉了;向所支持的Android类中注入一个对象,那么就会创建一个与之对应的Component对象,通过Component向Module里面去查找,而不是由支持的Android类对象直接去Module中查找对象,如此设计的原因:管理被注入的对象的生命周期和作用域(即:很方便地管理每一个模块对外提供的对象本身的作用域和生命周期问题);Component是根据Module类上边的InstallIn注解所标记的类型来相对应的(具体类型在3.2.2中有截图);
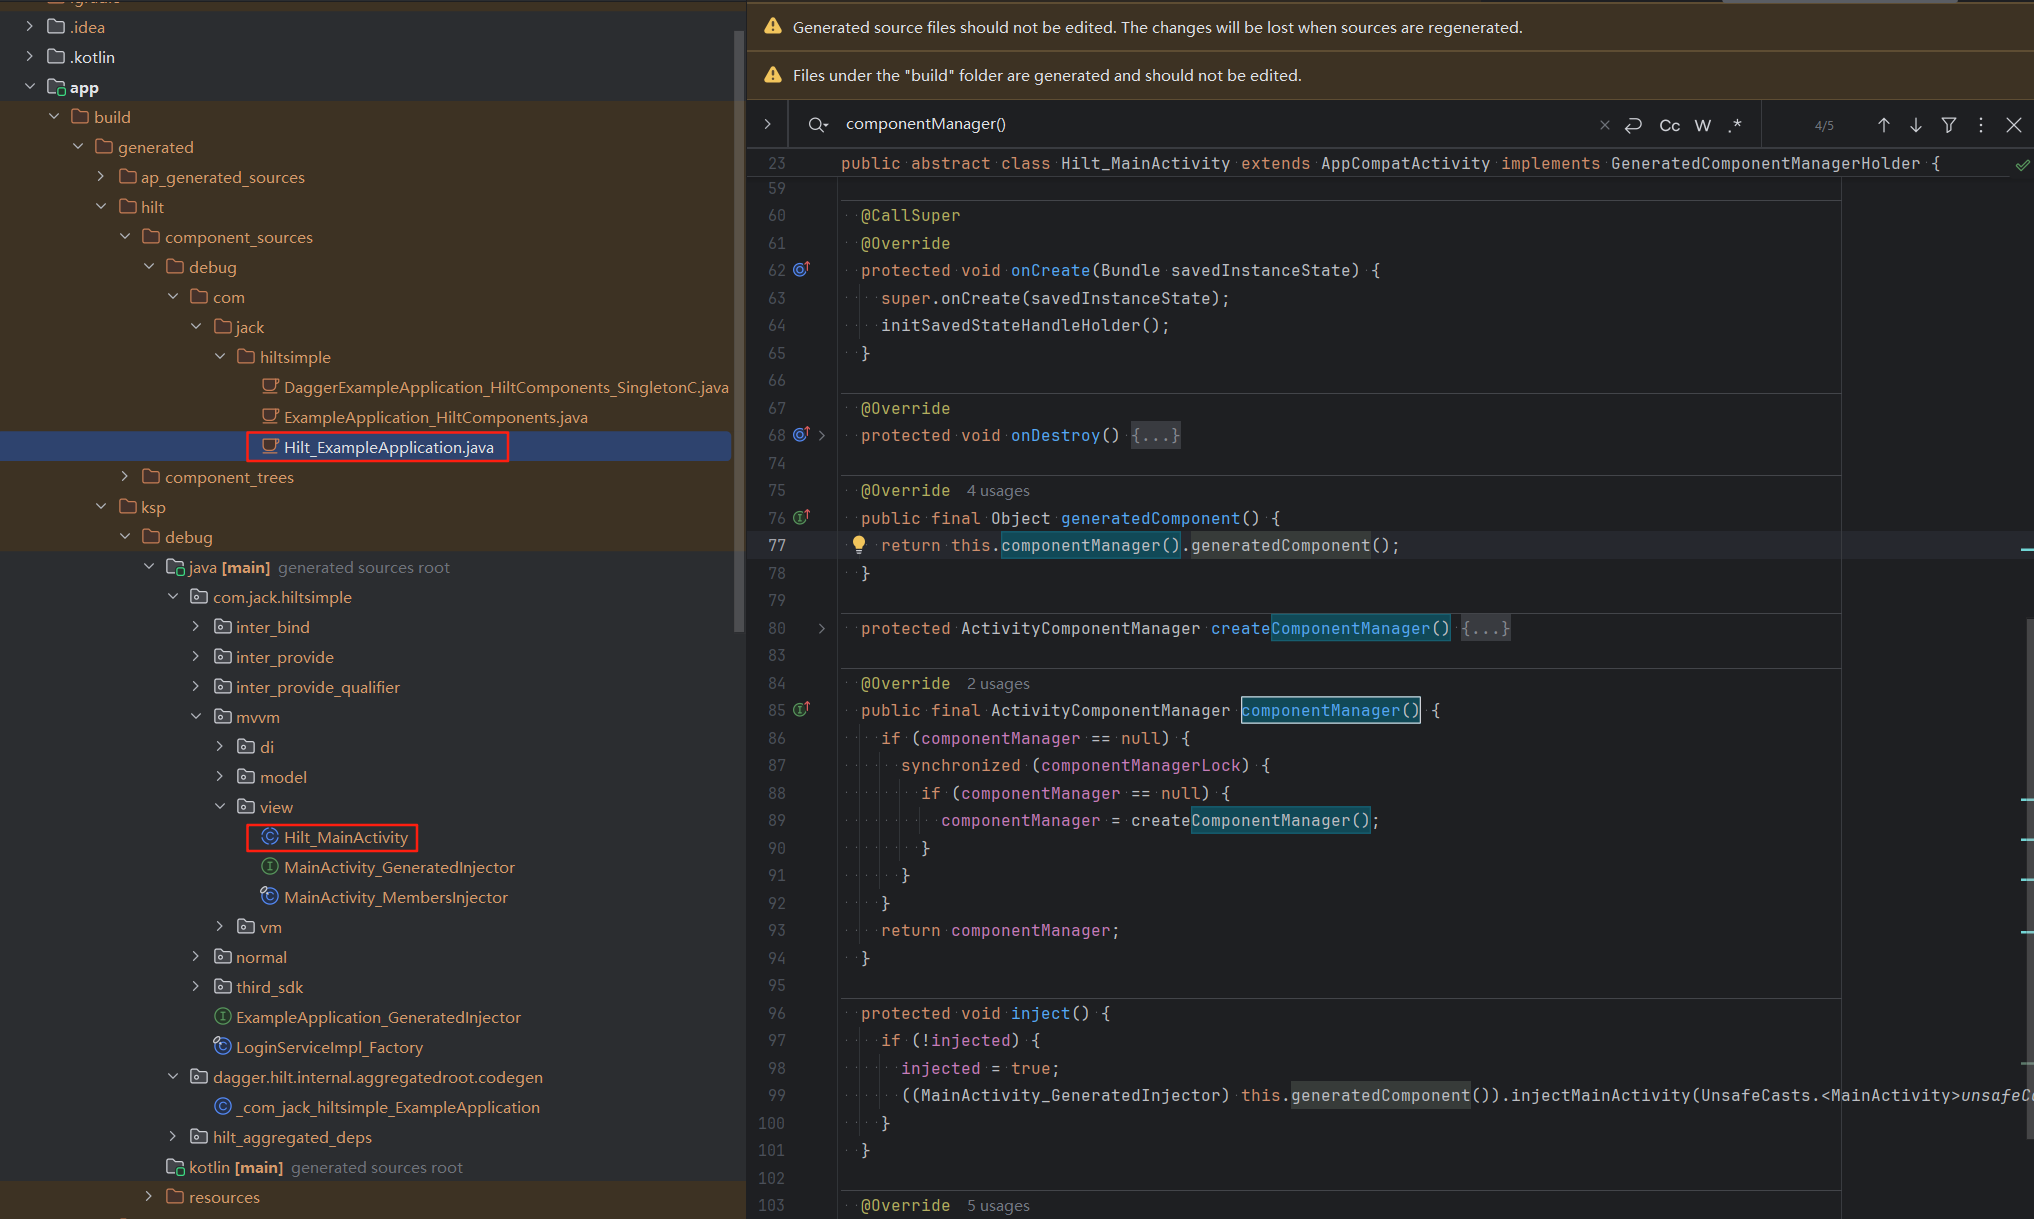
- 接下来我们从生成的文件Hilt_ExampleApplication和Hilt_MainActivity来开始源码分析,文件位置如下:
4.2.Hilt_ExampleApplication源码分析
- 该小节的源码分析目标:LoginServiceImpl的创建时机;
- Hilt_ExampleApplication目标:创建与Application相关的Component对象;源码:
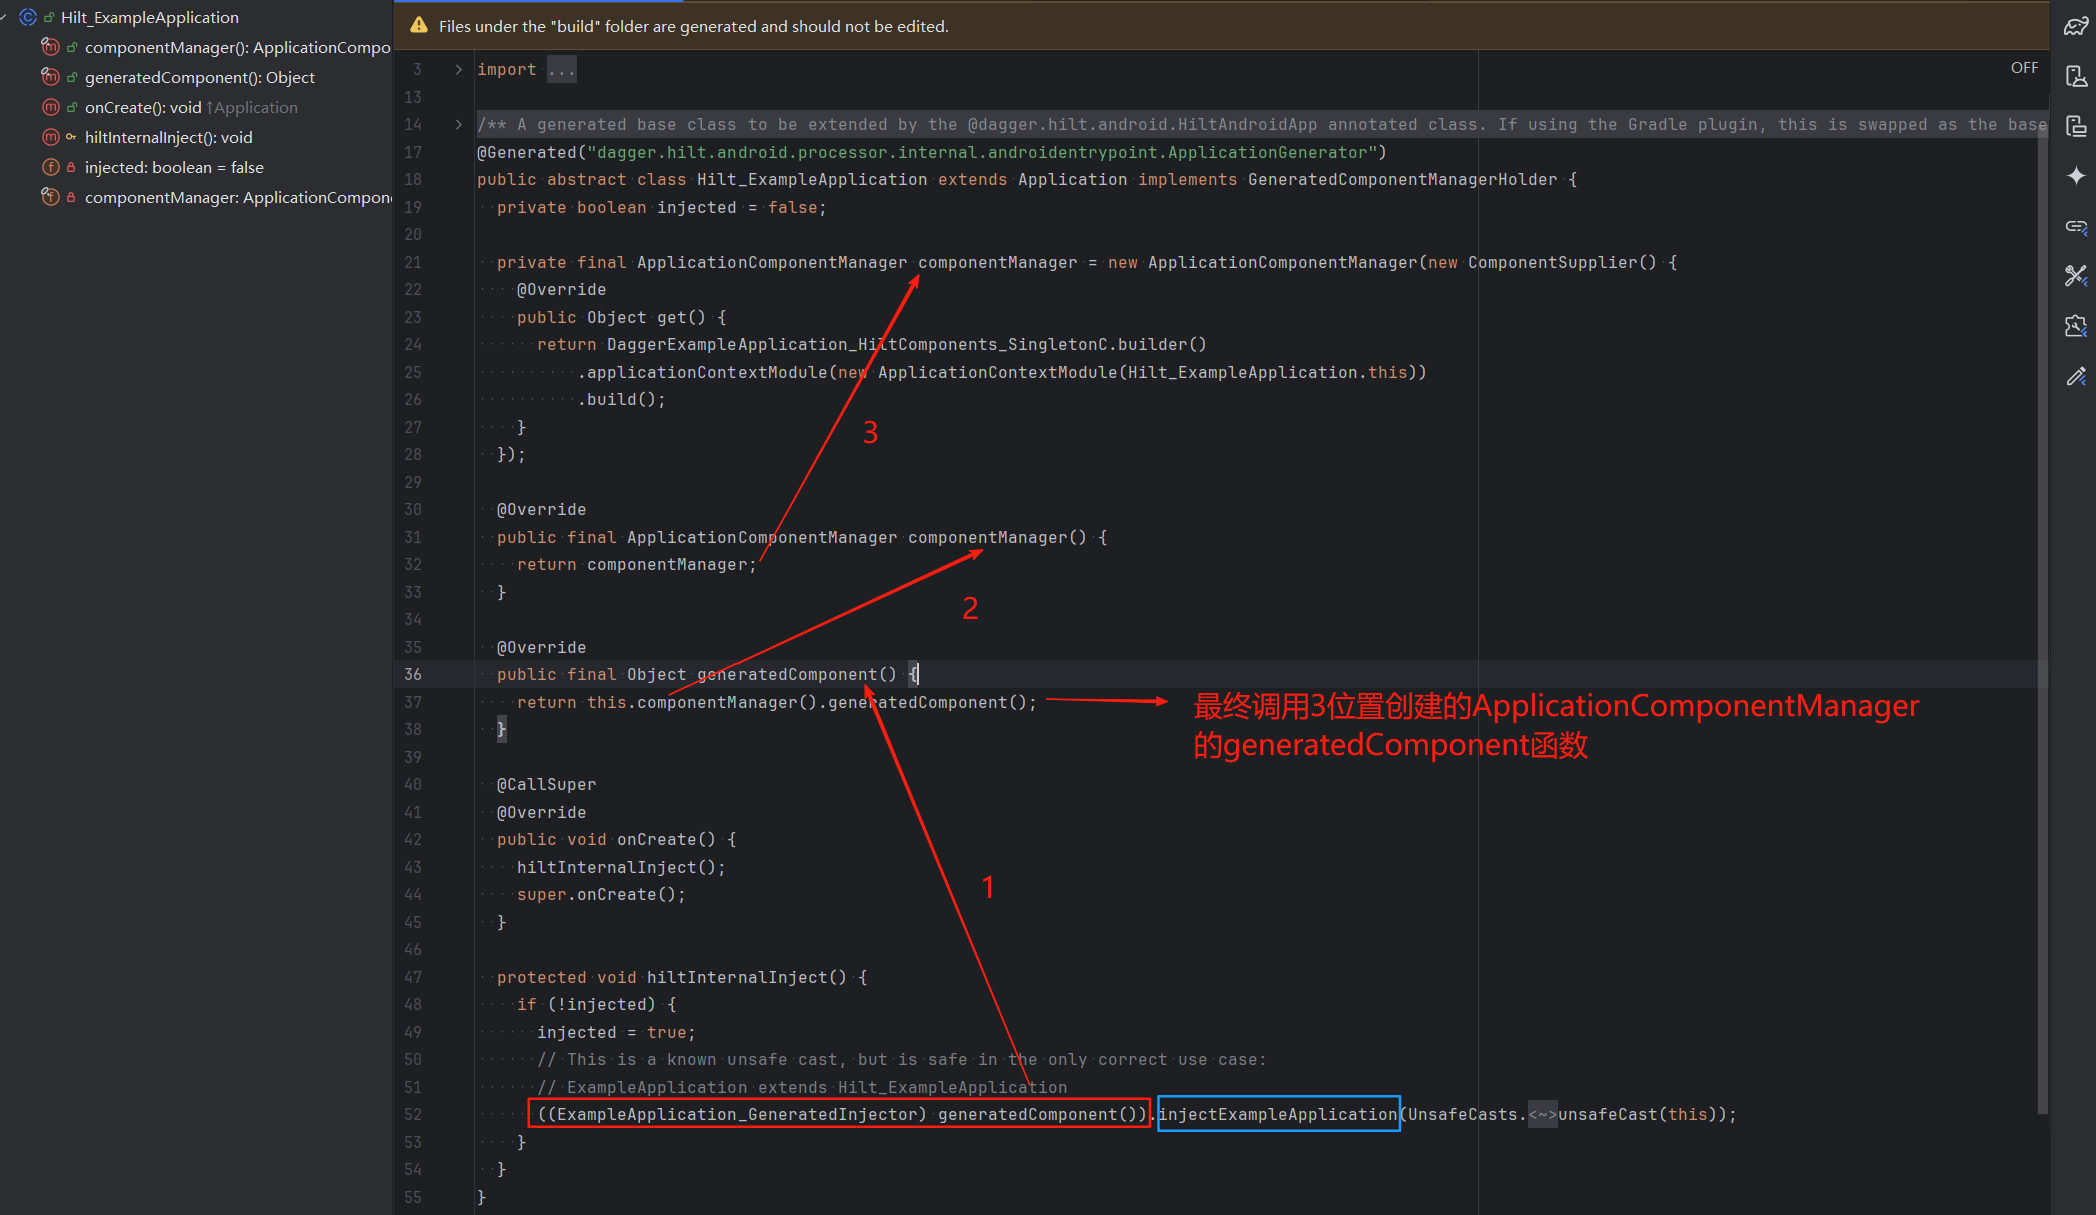
- 对于generatedComponent()函数而言,执行流程如图1,2,3步骤所指示,最终会调用ApplicationComponentManager的generatedComponent函数:
public final class ApplicationComponentManager implements GeneratedComponentManager<Object> {
  private volatile Object component;
  private final Object componentLock = new Object();
  private final ComponentSupplier componentCreator;

  public ApplicationComponentManager(ComponentSupplier componentCreator) {
    this.componentCreator = componentCreator;
  }

  @Override
  public Object generatedComponent() {
    if (component == null) {
      synchronized (componentLock) {
        if (component == null) {
          component = componentCreator.get();//分析1
        }
      }
    }
    return component;
  }
}
- 分析1:会执行Hilt_ExampleApplication中创建的匿名对象ApplicationComponentManager的get()方法,即分析2位置
private final ApplicationComponentManager componentManager = new ApplicationComponentManager(new ComponentSupplier() {
    @Override
    public Object get() {//分析2
      return DaggerExampleApplication_HiltComponents_SingletonC.builder()
          .applicationContextModule(new ApplicationContextModule(Hilt_ExampleApplication.this))
          .build();
    }
  });
- 分析2函数中return部分的代码,查看DaggerExampleApplication_HiltComponents_SingletonC类
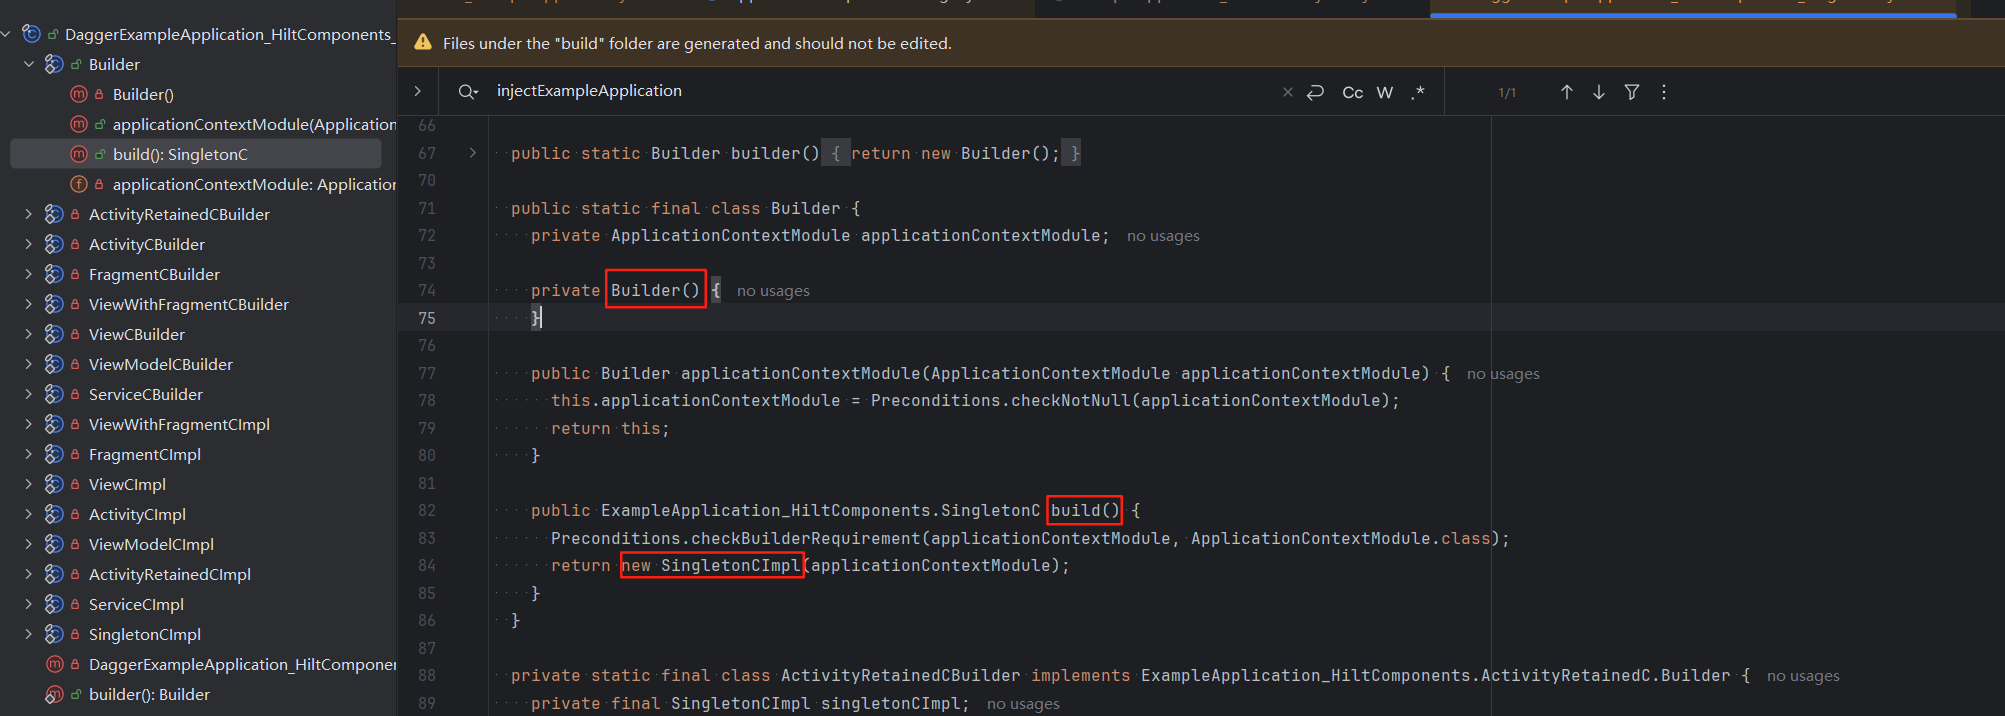
- 先调用DaggerExampleApplication_HiltComponents_SingletonC的builder(),再调用builder的applicationContextModule(内部执行了保存了applicationContext的操作)和build,其中build内部创建了SingletonCImpl作为返回值,根据源码关系可以知道,SingletonCImpl为ExampleApplication_HiltComponents.SingletonC的实现类,而ExampleApplication_HiltComponents中的SingletonC为其抽象静态类。我们继续分析SingletonCImpl代码:
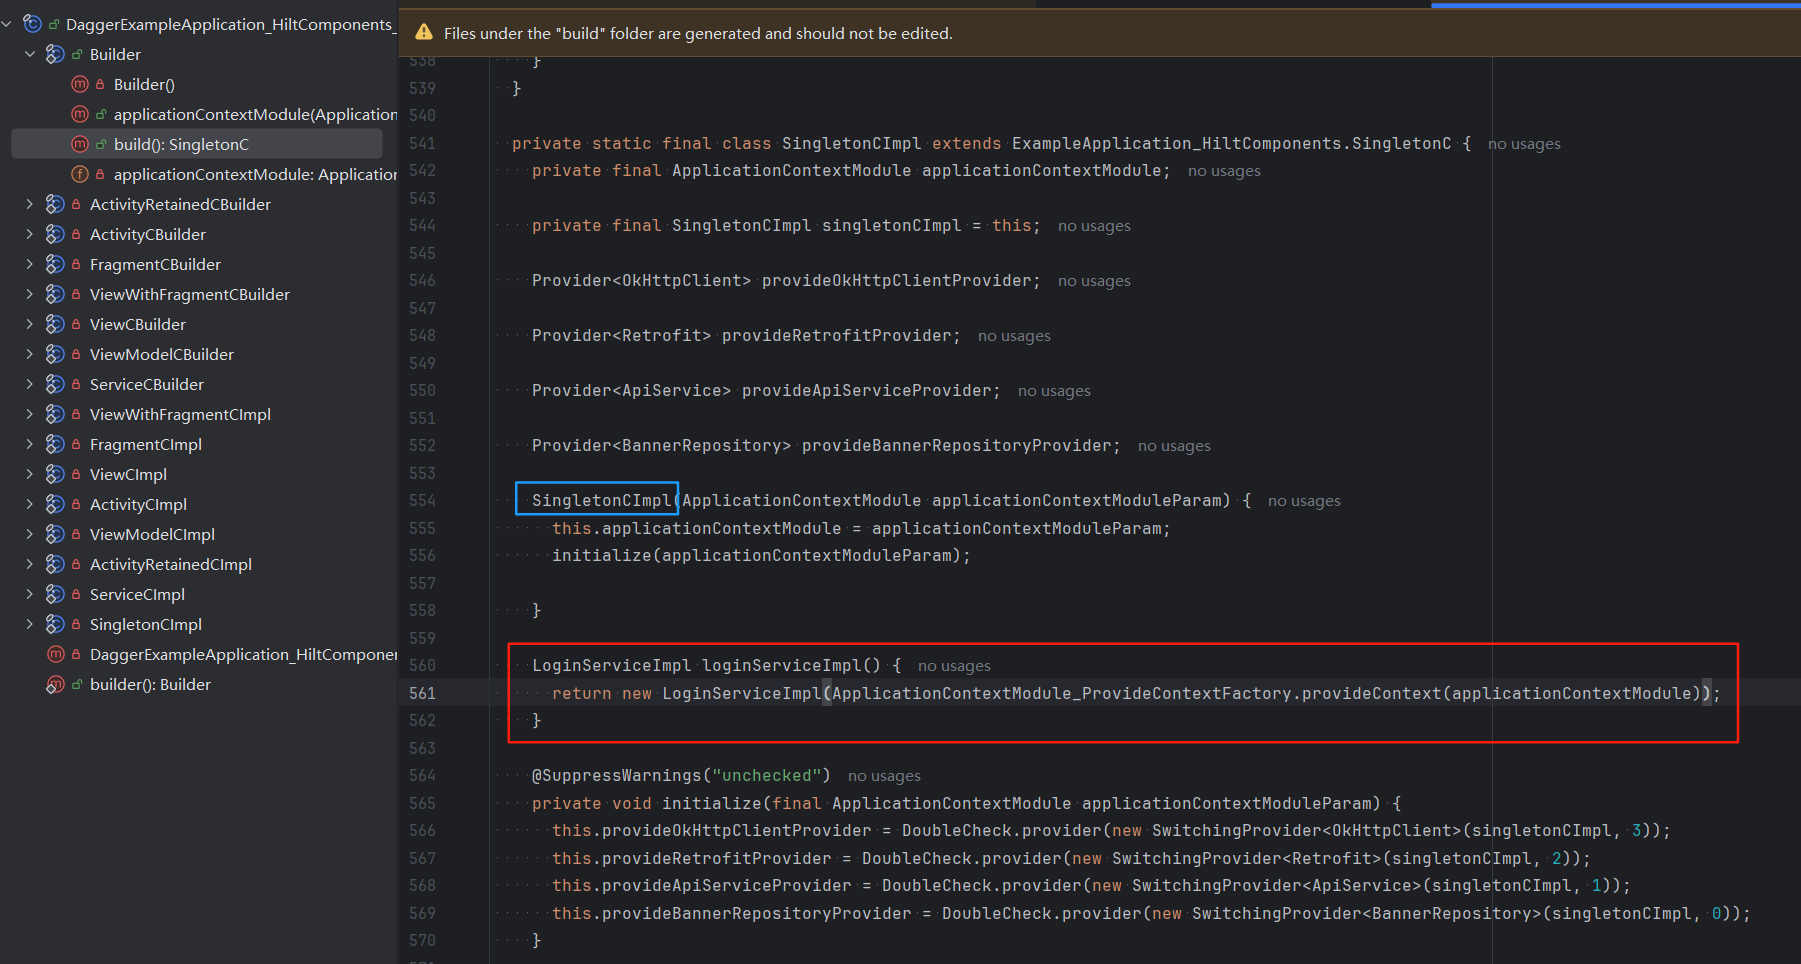
- 注意查看标记红色框架的部分,创建了SingletonCImpl,该类就是我们要分析的目标之一:LoginServiceImpl的创建时机;
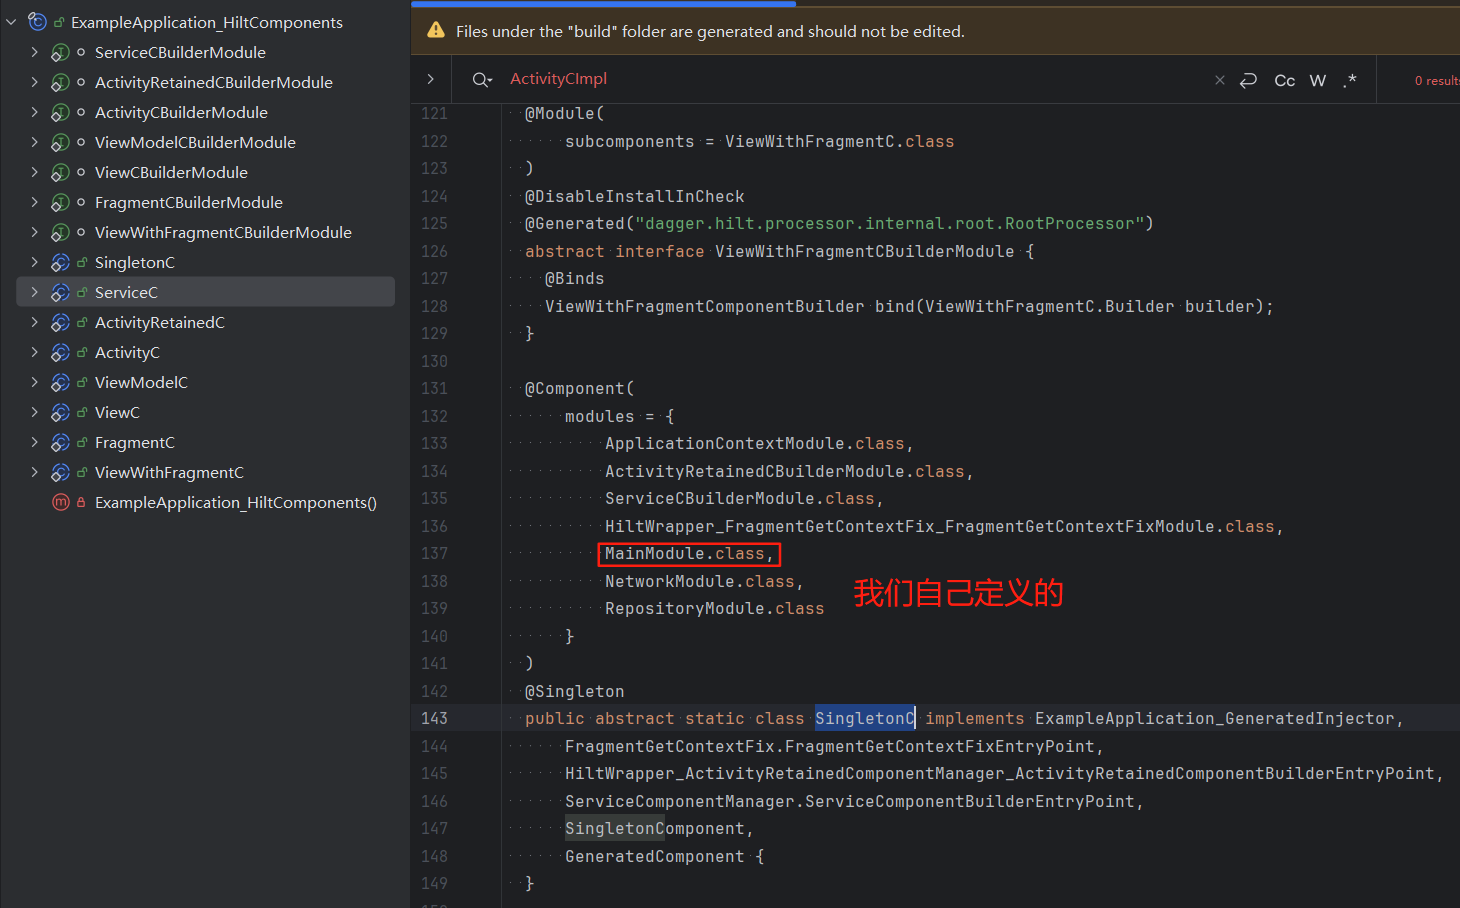
- 同时根据我们所分析的源码可以知道。我们通过Module中所暴露出来的方法所创建的对象LoginServiceImpl在SingletonCImpl中,而SingletonCImpl在SingletonC中,SingletonC又在ExampleApplication_HiltComponents(LoginServiceImpl是在SingletonCImpl创建的,SingletonCImpl是在Application相关的Component中创建的 & 生命周期跟Application一样长。关联关系跟编译时使用InstallIn注解所填写的来Components类型来决定将其跟哪一个组件进行关联)。即:Module中所暴露出来的方法所创建的对象会存储到对应的Component对象的具体实现里面,从而实现Module中所提供的对象跟Component在源码中所对应的对象类型 的生命周期相关联了;简单一句话:我们知道了Module和Component是如何关联起来的。还有一个位置也能看到Module和Component之间的联系;
- 再回到Hilt_ExampleApplication类中,有个函数为injectExampleApplication,其inject操作是对应的Component执行的;
- 至此,Hilt_ExampleApplication相关逻辑就很清晰了,总结一下:我们知道了,Hilt_ExampleApplication创建了与Application相关的Component对象,LoginServiceImpl的创建时机,LoginServiceImpl创建后存储位置,相关Component执行了注入操作,Module中所暴露出来的方法创建的对象跟相应的Component的生命周期有关联的;
4.3.Hilt_MainActivity类源码分析
- Hilt_MainActivity类文件
public abstract class Hilt_MainActivity extends AppCompatActivity implements GeneratedComponentManagerHolder {
  private SavedStateHandleHolder savedStateHandleHolder;

  private volatile ActivityComponentManager componentManager;

  private final Object componentManagerLock = new Object();

  private boolean injected = false;

  Hilt_MainActivity() {
    super();
    _initHiltInternal();
  }

  Hilt_MainActivity(int p0) {
    super(p0);
    _initHiltInternal();
  }

  private void _initHiltInternal() {
    addOnContextAvailableListener(new OnContextAvailableListener() {
      @Override
      public void onContextAvailable(Context context) {
        inject();
      }
    });
  }

  private void initSavedStateHandleHolder() {
    if (getApplication() instanceof GeneratedComponentManager) {
      savedStateHandleHolder = componentManager().getSavedStateHandleHolder();
      if (savedStateHandleHolder.isInvalid()) {
        savedStateHandleHolder.setExtras(getDefaultViewModelCreationExtras());
      }
    }
  }

  @CallSuper
  @Override
  protected void onCreate(Bundle savedInstanceState) {
    super.onCreate(savedInstanceState);
    initSavedStateHandleHolder();
  }

  @Override
  protected void onDestroy() {
    super.onDestroy();
    if (savedStateHandleHolder != null) {
      savedStateHandleHolder.clear();
    }
  }

  @Override
  public final Object generatedComponent() {
    return this.componentManager().generatedComponent();
  }

  protected ActivityComponentManager createComponentManager() {
    return new ActivityComponentManager(this);
  }

  @Override
  public final ActivityComponentManager componentManager() {
    if (componentManager == null) {
      synchronized (componentManagerLock) {
        if (componentManager == null) {
          componentManager = createComponentManager();
        }
      }
    }
    return componentManager;
  }

  protected void inject() {
    if (!injected) {
      injected = true;
      //分析3
      ((MainActivity_GeneratedInjector) this.generatedComponent()).injectMainActivity(UnsafeCasts.<MainActivity>unsafeCast(this));
    }
  }

  @Override
  public ViewModelProvider.Factory getDefaultViewModelProviderFactory() {
    return DefaultViewModelFactories.getActivityFactory(this, super.getDefaultViewModelProviderFactory());
  }
}
- 分析3:拆分成两部分,generatedComponent()函数和injectMainActivity函数,先分析前者
- generatedComponent()调用this.componentManager().generatedComponent(),继续调用,调用到ActivityComponentManager类中的generatedComponent函数,然后到其内部createComponent函数。
public class ActivityComponentManager
    implements
        GeneratedComponentManager<Object> {
  /** Entrypoint for {@link ActivityComponentBuilder}. */
  @EntryPoint
  @InstallIn(ActivityRetainedComponent.class)
  public interface ActivityComponentBuilderEntryPoint {
    ActivityComponentBuilder activityComponentBuilder();
  }

  private volatile Object component;
  private final Object componentLock = new Object();

  protected final Activity activity;

  private final GeneratedComponentManager<ActivityRetainedComponent>
      activityRetainedComponentManager;

  public ActivityComponentManager(Activity activity) {
    this.activity = activity;
    this.activityRetainedComponentManager =
        new ActivityRetainedComponentManager((ComponentActivity) activity);
  }

  @Override
  public Object generatedComponent() {
    if (component == null) {
      synchronized (componentLock) {
        if (component == null) {
          component = createComponent();
        }
      }
    }
    return component;
  }

  public final SavedStateHandleHolder getSavedStateHandleHolder() {
    // This will only be used on base activity that extends ComponentActivity.
    return ((ActivityRetainedComponentManager) activityRetainedComponentManager)
        .getSavedStateHandleHolder();
  }

  protected Object createComponent() {
    if (!(activity.getApplication() instanceof GeneratedComponentManager)) {
      throw new IllegalStateException(
          "Hilt Activity must be attached to an @HiltAndroidApp Application. "
              + (Application.class.equals(activity.getApplication().getClass())
                  ? "Did you forget to specify your Application's class name in your manifest's "
                      + "<application />'s android:name attribute?"
                  : "Found: " + activity.getApplication().getClass()));
    }

    //分析4
    return EntryPoints.get(
            activityRetainedComponentManager, ActivityComponentBuilderEntryPoint.class)
        .activityComponentBuilder()
        .activity(activity)
        .build();
  }
}
//ActivityComponent接口
@DefineComponent.Builder
public interface ActivityComponentBuilder {
  ActivityComponentBuilder activity(
      @BindsInstance
          Activity activity);

  ActivityComponent build();
}
//ActivityComponent接口
@ActivityScoped
@DefineComponent(parent = ActivityRetainedComponent.class)
public interface ActivityComponent {}
- 分析4,得到的是ActivityComponent,而ActivityComponent具体实现为ExampleApplication_HiltComponents.ActivityC
public final class ExampleApplication_HiltComponents {
//...
	@ActivityScoped
	public abstract static class ActivityC implements MainActivity_GeneratedInjector,
		ActivityComponent,
		DefaultViewModelFactories.ActivityEntryPoint,
		HiltWrapper_HiltViewModelFactory_ActivityCreatorEntryPoint,
		FragmentComponentManager.FragmentComponentBuilderEntryPoint,
		ViewComponentManager.ViewComponentBuilderEntryPoint,
		GeneratedComponent {
	@Subcomponent.Builder
	abstract interface Builder extends ActivityComponentBuilder {
	}
	}
//...
}
- ExampleApplication_HiltComponents.ActivityC还是一个抽象类,具体实现为 ActivityCImpl(在 DaggerExampleApplication_HiltComponents_SingletonC 类中)
public final class DaggerExampleApplication_HiltComponents_SingletonC {
	//...

    @Override
    public void injectMainActivity(MainActivity arg0) {
      injectMainActivity2(arg0);//分析5
    }

    //...

    @CanIgnoreReturnValue
    private MainActivity injectMainActivity2(MainActivity instance) {
      MainActivity_MembersInjector.injectILoginService(instance, singletonCImpl.loginServiceImpl());
      return instance;
    }
  }
  //...
}
- 总结一下generatedComponent函数的执行流程,从Hilt_MainActivity中,this.generatedComponent()—>this.componentManager().generatedComponent()—>ActivityComponentManager类的generatedComponent()—>ActivityComponentManager类的createComponent()—>得到ActivityComponent—>指向ExampleApplication_HiltComponents.ActivityC—>指向ActivityCImpl对象;
- 回到分析3,我们继续分析injectMainActivity函数,最终执行分析5位置,继续执行MainActivity_MembersInjector.injectILoginService(instance, singletonCImpl.loginServiceImpl()),源码如下:
  public static void injectILoginService(MainActivity instance, ILoginService iLoginService) {
    instance.iLoginService = iLoginService;
  }
- injectILoginService函数的参数1为MainActivity,参数2是从SingletonCImpl类中获取到的,我们前面已经分析过。instance.iLoginService = iLoginService所做的工作就是将前面创建的LoginServiceImpl赋值给MainActivity的成员变量iLoginService。至此:我们清楚了MainActivity中成员变量iLoginService的赋值时机;
4.4.iLoginService的生命周期为什么与应用进程相同
- 在定义的MainModule抽象类使用的InstallIn注解填写的是SingletonComponent组件,而SingletonComponent组件注入器面向的对象是Application。LoginServiceImpl是在SingletonCImpl创建的,而SingletonCImpl是在Application相关的Component中创建的,与Application相关的Component的生命周期跟Application一样长。因此,可以推导出iLoginService的生命周期跟应用进程相同;
4.5.总结
- 不论是Hilt_ExampleApplication,还是Hilt_MainActivity类存在共同点
- 都会创建以Hilt_为前缀 + 类名为后缀的文件,作为对象注入的管理类;
- 运行时ExampleApplication和MainActivity的父类都会被替换成Hilt_xxx类;
- 都会在初始化时机创建相应的Component;
- 都会调用injectXxx函数开始注入对象;
- 关于Component,其很方便的管理每一个Module对外提供的对象的生命周期和作用域的问题 & 通过Component向相应Module里查找对象;
- 另外,关于几个比较重要的注解再总结一下:
- HiltAndroidApp 注解的三个作用
- 1.提供全局的applicationContext,生成相关实现类;
- 2.生成Components组件;
- 3.为Application提供依赖注入能力;
- AndroidEntryPoint
- 生成相关的实现类,为Activity,Fragment,View,Service提供依赖注入能力 ;
- Inject
- 标记需要注入的字段或参数,其类型不能为private;
- Instanll
- 1.用来告诉Hilt这个模块可以被哪些组件应用;
- 2.同时声明该模块中的生命周期;
- HiltAndroidApp 注解的三个作用
- Hilt的局限性,Hilt支持的入口点中不包括ContentProvider。原因:ContentProvider的话,应该知道它的生命周期是比较特殊的,它在Application的onCreate()方法之前就能得到执行,而Hilt的工作原理是从Application的onCreate()方法中开始的,也就是说在这个方法执行之前,Hilt的所有功能都还无法正常工作。也正是因为这个原因,Hilt才没有将ContentProvider纳入到支持的入口点当中。
五.总结
- Hilt简化了Dagger2在Android平台上的使用。文章所提供的案例基本上可以覆盖较多的开发场景,对于Dagger2和Hilt,两者都可以看作是双刃剑,实际项目中是否使用需要有一定的衡量。
评论区